 Twinsubs
How to add bilingual subtitles to a video on Mac
You have a video with no subtitles and want a bilingual file, with your language on top and the original below. This walks through the whole flow, ending in one .srt file that CapCut, Final Cut Pro and IINA can all use. The example is a Chinese-language video with English as the target; the languages are only an example and you can change them. If you make videos for a living, there is a section on the order of work from footage to finished video.
First, decide what you want to end up with
“Adding subtitles” can mean two different results, and they are made differently:
- A subtitle file (soft subtitles): a text
.srtstored next to the video. A player or editor reads it, and you can edit it or swap languages at any time. This guide is about this one. - Subtitles burned into the picture (hard subtitles): the text becomes part of the image and cannot be changed. For this, get the SRT first, then burn it in when you export from an editor such as CapCut or Final Cut Pro.
Making the SRT first and deciding about burning later saves the most rework: while proofreading you edit text, not re-render video.
The full flow
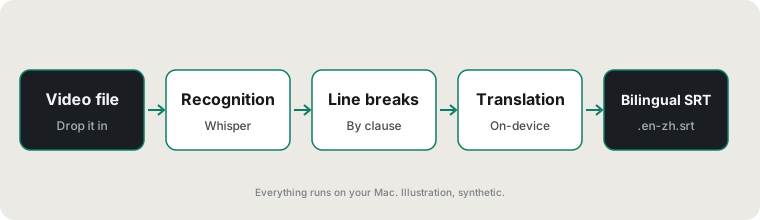
- Speech recognitionTurns the audio track into timed text in the original language. This sets the floor: a misheard word only gets mistranslated afterwards. Heavy accents, loud background music and many specialist terms all raise the error rate.
- Line breakingRecognition gives you one long run of text. It has to be cut into cues at pauses and punctuation, each on screen for roughly 1 to 7 seconds. A break in the middle of a word, or three lines in one cue, means this step was done badly.
- TranslationEach cue is translated into the target language. Translating cue by cue loses context, so watch pronouns and elliptical sentences. Machine translation is most likely to slip on numbers, names and product names.
- Merging into a bilingual SRTTwo lines under one timecode: target language on top, source below. Keep the top line short, or it wraps on a phone screen.
- Import and proofreadPut the SRT into an editor or player, play it against the picture, and fix proper nouns and line breaks.
Doing it on a Mac with Twinsubs
Twinsubs wraps the first four steps in one window:
- Drop in the videosYou can drop many at once; they are processed in a queue.
- Let it runRecognition runs on your Mac with Whisper large-v3-turbo. The source language is detected automatically (or you pick it), you choose the target language, and translation uses the on-device translation built into macOS; the available language pairs depend on what Apple's on-device translation supports. The first launch downloads the speech model once, and after that it works offline.
- Pick up the files beside the videoYou get a bilingual file
video.target-source.srt(for exampleInterview.en-zh.srt, target on top and source below, order switchable in Settings) and a target-only filevideo.target.srt(for exampleInterview.en.srt).
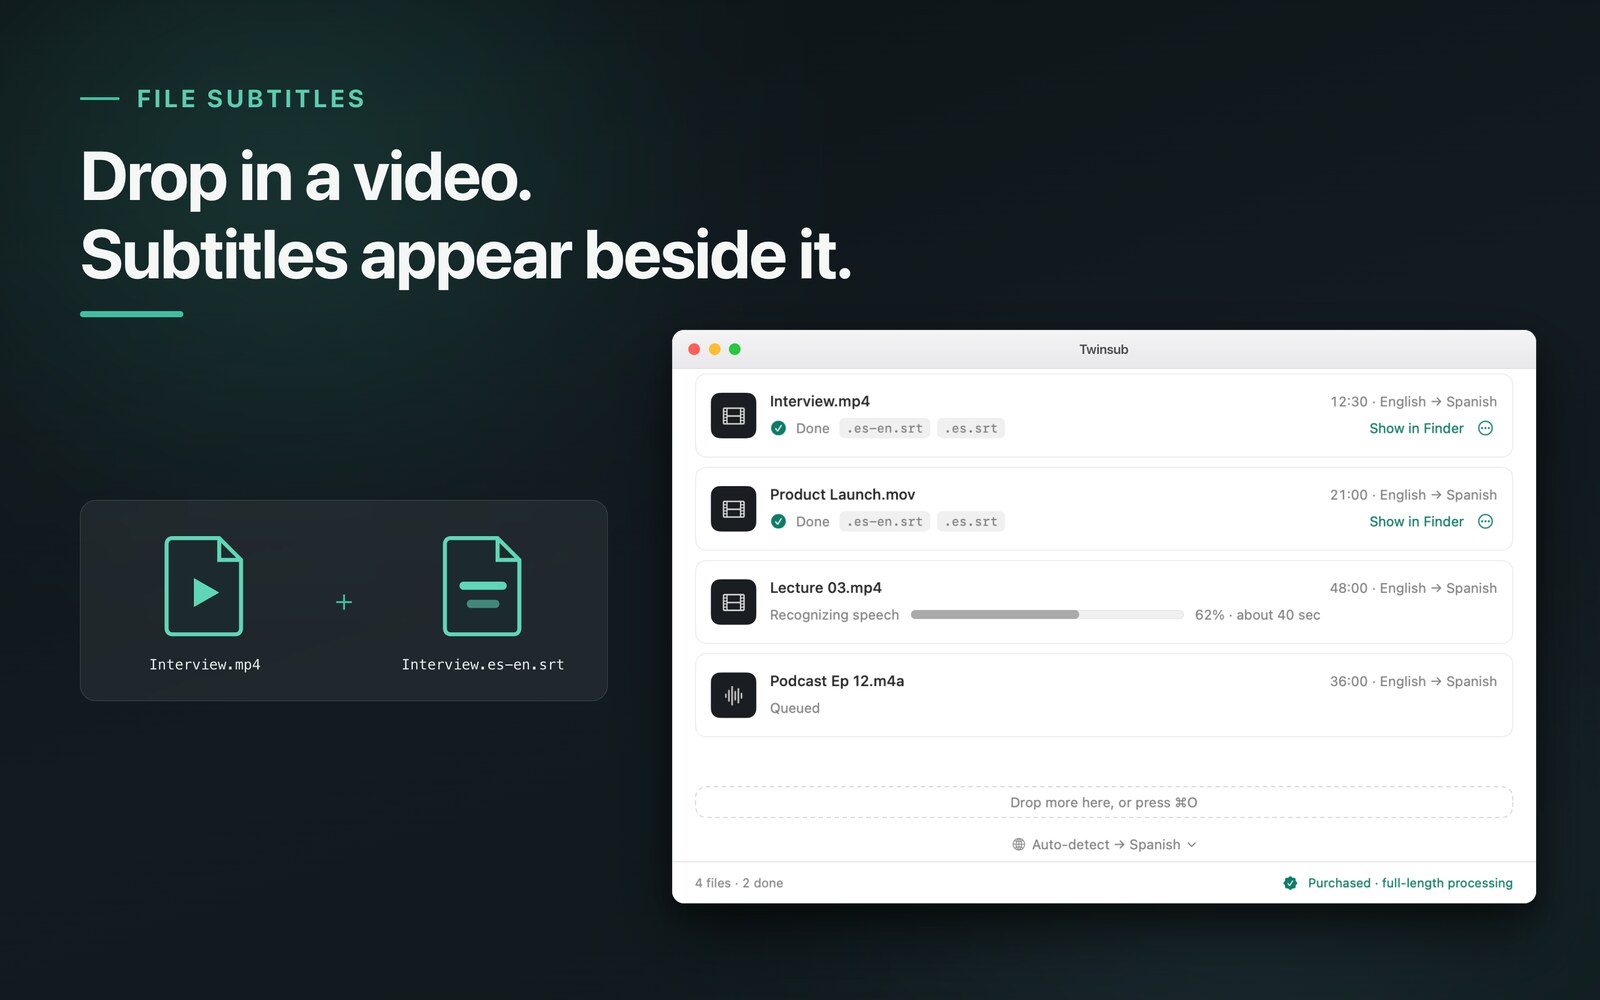
.es-en.srt and a target-only .es.srt (this run is English to Spanish), and “Show in Finder” takes you to them. The third row shows recognition progress and the fourth is waiting. “Auto-detect → Spanish” at the bottom of the window is the source and target language setting.It only produces subtitle files: it does not burn them into the picture and has no built-in subtitle editor. Proofread in any text editor or editing app; see How to check and edit SRT subtitles.
Twinsubs is coming soon to the Mac App Store and needs macOS 26 or later on a Mac with Apple silicon. The free version processes the first 10 minutes of each video; a one-time purchase removes the limit.
If you make videos: from footage to finished video
If you translate, localize or comment on foreign-language video, subtitles are the slowest part. Splitting the work into “the machine drafts” and “a person proofreads and lays it out” puts your time where judgment is actually needed.
- Confirm you may use the footageIf you translate or build on someone else's video, get permission or confirm the licence first. A subtitle tool does not solve copyright, and Twinsubs' Terms of Use say responsibility for the content lies with the user.
- Produce a bilingual SRT draftDrop the video into Twinsubs. For a batch of footage, drop everything in, let it queue, and review the results one by one.
- ProofreadCheck proper nouns and numbers first, then watch it through; the method is in checking and editing SRT.
- Import into your editorCapCut and Final Cut Pro can both import it; the steps are in the import guide.
- Style and exportSet the font, outline and position once in the editor, and burn the subtitles into the picture on export. An SRT carries no styling of its own.
Why creators choose local subtitling
- Footage you do not want to send out before release: a partner's unreleased material is processed on your Mac, with no upload.
- No per-minute billing: for a series, total running time adds up, and a per-minute service costs more as you publish more. Twinsubs is a one-time purchase, and the free version processes the first 10 minutes of each video, so you can try it on your own footage first.
- Subtitles that fit your existing workflow: the output is standard SRT, tied to no particular app.
Honestly, what it does not do
- It does not burn subtitles into video; styling and export are left to your editor.
- It has no built-in subtitle editor, no speaker separation, and does not output ASS.
- Machine translation makes mistakes, especially with slang, jokes and idioms, so proofread before you publish.
If your workflow is already built around an editor's own caption recognition and you pay for it, you do not have to switch. The trade-offs are on the comparison page.
When the result is not right, check these first
- Recognized as the wrong language, or garbage throughoutAutomatic detection can guess wrong when the video opens with a long stretch without speech, or mixes several languages. Change “Auto-detect” at the bottom of the window to a source language you pick, and process it again.
- A video in your own language was not translatedWhen source and target are the same language, only a punctuated single-language file is written and nothing is translated. To translate it, change the target language.
- Only the first part of the video was processedThe free version processes the first 10 minutes of each video. After the purchase it processes the full length.
- The two languages are the wrong way round in the bilingual fileBy default the target language is on top and the source below; you can switch the order in Settings.
- A language pack download is requested during translationTranslation uses the on-device translation built into macOS. The first time you translate a language, the system asks you to download its language pack; after that it works offline.
- A passage that reads badlyFirst decide whether recognition misheard or the translation is clumsy: listen to the video. Fix a mishearing on the source line, and a translation problem on the target line.
Other ways to do it
- Editors such as CapCut have their own caption recognition and translation, but whether it needs a paid plan or an internet connection is for you to check in the app. See the comparison of Twinsubs, CapCut, MacWhisper and online subtitle tools.
- Run open-source Whisper on the command line for the original-language subtitles, translate them with a translation tool, then merge the two files by timecode by hand. It works, but the merge is slow and suits people who like to tinker.
Example: what a bilingual SRT looks like
These are the first two cues of a real run, a plain text file that any editor can open:
1
00:00:00,060 --> 00:00:02,900
I want to have a chat with you today.
今天我想和大家聊一聊,

2
00:00:02,900 --> 00:00:05,300
How can a small team
spend very little money?
一个小团队怎样用很少的钱
FAQ
Can I process several videos at once?
Yes. Drop several video or audio files into the window together. They line up in a queue and are processed one after another, each file on its own row with its progress and status.
Where do the subtitle files end up?
In the same folder as the video, right next to it. Each finished file has a “Show in Finder” link in the window that takes you straight to the files.
Does it need an internet connection?
Recognition and translation both run on your Mac, and the video is not uploaded. You need a connection once, to download the speech model, and macOS may ask you to download a translation language pack; after that it works offline.
Can it burn the subtitles into the video?
No. Twinsubs only produces SRT subtitle files. To put the subtitles into the picture, import the SRT into an editor such as CapCut or Final Cut Pro and choose to burn them in when you export.
How accurate are recognition and translation?
Both are machine output and make mistakes, especially with heavy accents, loud background music and many specialist terms. Check proper nouns and numbers against the video; the method is in the guide to checking and editing SRT.
What should I watch for when translating someone else's video?
If you translate or build on someone else's video, get permission or confirm the licence first. A subtitle tool does not solve copyright, and Twinsubs' Terms of Use say responsibility for the content lies with the user.
Updated 2026-10-12. Back to the Twinsubs home page